Tips,Tricks,Techniques,Tutorials,Product info&a monthly challenge blog

Click HERE to enter for this months challenge

Search This Blog

Monday 14 May 2012

WINNERS OF CHALLENGE#5

Hello!!!
thanks for all the lovely people out there who joined us for challenge#5.Its a pleasure seeing your creations:)But i feel the entries was less last time..what happen people..come on we have some awesome challenges n prizes up for grabs,,hope to see more of you this time:)

Ok now on to the winners of challenge#5,first for the winner of the prize pack sponsored by crafter's corner chosen random goes to..............
....................................................................................
....................................................................................
No#1.Deepti Stephens

Congrats girl,please mail me your address to kavi_kalalayaa@yahoo.co.in.You have 48 hours to claim your prize.


The top 3 winners are chosen by voting system by our design team members.


Now on to the top#3 in no particular order is...........

shubhra for her colorful layout...


Khushboo for her beautiful fold card


Pritesh for her beautiful quilled wall hanging

Congratulations ladies,here is our new Top3 badge,designed by our talented design team member mallika:)please feel free to grab the badge n wear it with pride:)


Now don't forget to join in our new challenge this month with some amazing prize up for grabs.So what are you waiting for,let the creative juices flow,we love to see what you cook up with our recipe this month:)))


Happy crafting,
kavi

Thursday 10 May 2012

Heart Punch Flower Tutorial !!

Hi Everyone,
                 Today I am Sharing with you all  a Tutorial for making a Flower using Heart Punch..Please be Warned that This is a Picture -Heavy Post       As I Could Not Skip any Steps...I am showing You the tutorial for This Flower :-


So here's What You will Need To Make This Flower :-

As You can see You will Need a Medium Size  Heart Punch and a  Daisy Punch and  Glue,A Needle tool ,Forceps and Scissors to Start Off...!!!

   Then, You Need to Punch out Approximately 20-30 Hearts and 2 Daisies..

 Take the 2 Daisy Punched flowers and Add a drop of Glue In the Center of 1 and ,Place the other Daisy on it and Emboss it as Shown   in the Picture,... Here I have used an Embossing tool but You can Always use the back of a Ball -Point pen or Pencil to Emboss the flower...
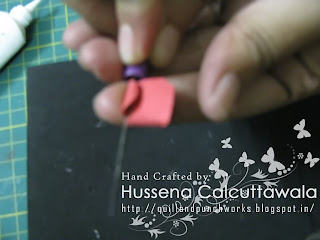
    Now,Take the Punched -heart and  Cut off the Pointed End with Scissors ,Then,Start Rolling the 2 sides of the Heart as Shown in the Picture...
   Now, Roll the Center of the Heart using the needle -Tool as Shown in the Picture ......Now,This will Make the Petals of your Flower,Make Atleast 15 to 20 Petals in this Manner!!
 Now,start Layering the Petals on the Embossed Daisy as Shown in the Picture...I have made the Base using 6 Petals...But You can Vary the number Of petals according to the Size of The Flower you want!!  
   I have Added the 2nd and the 3rd row of Petals Similar to the First Row....The 2nd and the 3rd  Row  have 5 and 4 Petals Respectively!!  
                                       
    Now, For the center of The Flower, Take a heart Punch and Cut  1/4 of the bottom half of it  and Roll The Petal As Shown....This will Form the center of The Flower....        
                                                                                                                                                                           
      Now,After You Placed all The layers Take a Circle Punch and  Punch Out 1 Circle...This will Form the Main  Center  Bud of the Flower   .......

                                                                                                                                                                                                                                                                                                       
  Roll The Circle into a Tight Bud,As Shown Above using your Needle -Tool, And Place It In the very center of The Flower.....And you will get  the Following Flower as a Final Result!!
                                   
  Roughly,Cut 2 leaves   .                                                                        
  Then,  Shape the  Veins Using your needle Tool as Shown   ....   
     I hope you all Liked My Tutorial and  Understood the Steps Properly....But if you Have any Doubts or  Questions You can Always Leave Me a Comment or mail Me!!And I will Surely try  to Answer your Queries :)      
                                          ~Hussena.                                                                                              

Wednesday 9 May 2012

A RECIPE CHALLENGE NO. 6

Hi friends, This is Anita hosting the new Challenge. I hope you all enjoyed playing along the challenge 5. The winners will be announced soon.
Till then, here is the new challenge #6 which has a recipe to follow.

Challenge # 6

1. Use a bow on your project.
2. Use some form of stamping other than stamping the sentiments
3. Use a sentiment/flower or both on your card.
EASY!!!!

So let your mojo on roll and get to your desk to create something using the above recipe.

Who can play:Anybody who are into any type of arts n crafts.It can be a painting,crochet,embroidery,clay work,paper crafts etc.

How to play:Make a new project(no back linking to old projects) based on this months theme,post it on your blog with a link back to this blog(its must),come back and leave a link to your project(not your blog).You can enter up to 3 times.You can combine upto 10 challenges including ours.

Prizes:At the end of the challenge a random winner and top 3 will be selected by the team members.The random winner will get a price package from the sponsor.


This prize has been sponsored by Shalini Mittal of Crafters Corner.
This is a one stop craft store in India where you can find the best crafting brands under one roof. DCWV, TIM HOLTZ, SPELLBINDERS, BIG SHOT, SIZZIX, MARTHA STEWART and many others. Also things can be made to pre order and you can be sure of getting them at your door step. Now the full line of MAGNOLIA STAMPS AND DIES are also available here. In a few words, now no more drooling over foreign online stores. Crafters corner is your answer to all your crafting needs and that too at an affordable rate. The best part about this store is that you get your product at your door step within 48 hours because of its excellent courier service.
So no more wish lists. For more details n catalogs,contact them at mshalini79@yahoo.com or visit their facebook page for all latest update on products..Do you know what the prize this month?


Yes!! You got it right!! Its a paper trimmer from Jef and the winner will be getting one purple colored trimmer from our sponsor.
The Jef trimmer is a must have for any crafter. It is 6'' broad and its fine blade can cut any thickness paper. The board has fine grid lines for accuracy.
.

And now feast your eyes on these fab creations from our DT.


What a beauty!! Love all the details here.


Hussena

That red rose steals the show.


What a fabulous flower!!


Delightful cute tags


Mallika's flowers are inspired by JUHI"S tutorial here.
The Vintage Queen is all in action


For my mother with a vintage feel.


So get what are you waiting for. Get going and start creating. You can submit your entries till 9th June. For any enquirers just mail me.


Saturday 5 May 2012

Super easy layered handmade flower tutorial


Hi, this is Juhi and I am going to show how to make these layered flowers. I get a lot of queries from non-regular crafters on how to make and embellish cards for their loved ones......so I decided to post a tutorial on how make handmade flowers using material which is easily available at home. These flowers can be made in less than 5 minutes and require no fancy craft tools or supplies!
Things required:
1. Thick handmade paper/cardstock ( I used a wedding invitation envelope).
2. Scissors
3. Glue
4. Stapler (optional)
5. Something for the flower center - buttons/half cut pearls/beads.....
6. Paint brush or a pen - this will be used to roll the flower petals
Roughly cut out 3 circles of different sizes (my biggest circle has a 2 inch diameter).....these circles don't have to be perfect (mine are freehand).....I have used the printed side of the wedding invite to add some color.
Give 6-7 equally spaced radial cuts on the circles. be careful not to cut till the center but slightly less than that. These will be the flower petals
Roll the petals around the end of a paint brush or pen.
Stack the rolled layers and staple in the center.
Make the flower center with a button/half cut beads or whatever you like and your flower is ready! Increase or decrease the number of layers to get bigger or smaller flowers.
I hope this was easy enough.....do lemmi know if it was not!
Thanks for visiting!